vendredi 21 mai 2010

Step By Step - Clustering SQL Server 2008 R2 - Part II

 
Part I – Before we start
Part II – Creating Windows Cluster
Part III – Clustering MSDTC
Part IV – Installing the first SQL Server Cluster Node
Part V – Adding the second node
Part VI – Post installation tasks
  
Before processing this step by step guide you should ensure that the system requirements described on the part one of this post are meet and use the CLSSetup domain account to open a session on each node.
On this part we will create the Windows Cluster, this action can be  performed on the node owning the shared storage.


Creating the cluster

1From the Start menu click Administrative Tools ==> Failover Cluster Manager
 image
2On the management Section click Validate a Configuration…
 image
3Click next on Before You Begin page
 image
4Type the names of the servers that will participate on the cluster and click add for each one.
Click Next on the Select Server or a cluster page
 image
5Check Run all test and then click Next on the Testing Options page
 image
6On the confirmation page click Next
 image
7Wait for the test finish and when you see the Summary page ensure that all test are Ok and click finish.
 
 image
8On the previous page you can click View Report to explore the test report that was generated by the validation process. 
 image
9If the validation process was successful we can create the windows Cluster by clicking on Create a cluster on the management section.
 image
10Click Next on the Before You Begin page 
 image
11Type the nodes names and click add for each one and then click Next on the Select  Servers page
 image
12On the Access Point for Administering the cluster type the Virtual computer name that will be used for this windows cluster and it’s virtual IP address on the LAN segment.
this name will be added as computer account on your Active Directory that’s way the user used for the configuration process must have the right to join computers to the domain.
 image
13On the Confirmation page click Next
 image
14Wait for the cluster creation
 image
15On the Summary page click Finish
 image


Configuring the Quorum

16By default Windows Cluster process creation will choose the smallest shared disk as the quorum.
In some cases we will not use shared disks as Quorum for the cluster but a file share.
to configure the quorum of the cluster click on More Actions ==> Configure Cluster Quorum Settings… from the Actions section on the right pane of the Failover Cluster Manager  console        
 image
17Click Next on the Before You begin Page
 image
18To ensure that our services still available with only one node online we should use Node and Disk Majority or Node and File Share Majority to construct our quorum.

for this scenario we will use a disk so you have to check the second option and then click next 
 image
19Ensure the the disk dedicated for the quorum was selected and click Next
 image
20On the confirmation page click Next
 image
21On the Summary page click finish 
 image
 

Configuring the network

22At this point our Windows Cluster is created and configured, on the next steps we will configure the network settings for the cluster.
from the left pane right click Cluster Network 2 ==> Properties 
 image
23Verify that it’s IP address is the one used for the heart beat and than name it Heart Beat
uncheck Allow clients to connect through this network and then click on Apply
   
 image
24Now we will configure the LAN network interface,
Right click it from the left pane then click on Properties 
 image
25Rename it to LAN and ensure that the check box Allow client to connect through this network is checked
click Apply   
 image

Step By Step - Clustering SQL Server 2008 R2 - Part I

Part I – Before we start  
Part II – Creating Windows Cluster
Part III – Clustering MSDTC
Part IV – Installing the first SQL Server Cluster Node
Part V – Adding the second node
Part VI – Post installation tasks


Introduction

On this post series we will configure step by step a two node SQL Server 2008 R2 Cluster.
To perform this guide we will use a Hyper-V environment as described on the following picture:
image
This article is devided to 4 parts, each one will cover one or mores tasks needed for the configuration and installation of the full functionnal SQL Server 2008 R2 Cluster, on this article we will ficus on clustering only the Database Engine of SQL Server, in futur we will post other step by step guides for clustering Analysis Services and implementing high availability of other non cluster aware SQL Server Componenents like SQL Server Reporting Services.
Part I will cover the preparation of the servers and the requirements regarding Active Directory and security, on Part II we will configure the Windows Cluster after that the Part III will give us details about clustering the MSDTC service, Part IV will give us the step by step guide to install the first node of the SQL cluster, after that we will discuss on Part V the second node add process and finally we will cover the post installation tasks that we should done on the Part VI.

Preparing the servers


Hardware Requirements

On cluster environment we should have access to a shared storage, for this article we will use a software solution Starwind that will transform our domain controller to iSCSI Server.
Each node of the cluster must have at least two network interface, one for the LAN and one for the heart beat.

User accounts, Groups and permissions


Least privileges will be applied on this articles and we will use only the needed permissions to all accounts that we will use on the installation and configuration process.
For SQL Services we have standard domain accounts :
  • SQL Database Engine Service account (SQLDBEngine)
  • SQL Agent Service account (SQLAgent)
To perform the installation and the configurations actions on the cluster nodes we will use an account named CLSSetup with the following permissions :
  • Local administrator on each node
  • Join computer to domain (delegation Active Directory)

Windows Roles and Features


The actions performed on this part should be done on the two nodes.
1 

From the Server Manager console, select Features and then click Add Features
 image
2 

Check .NET Framework 3.5.1 Features on the Select Features dialog and when asked to add role services and features required click on the button Add Required Role Services
 image
image
3 

Check failover Clustering and then click Next on the Select Features page
 image
image
4 

On the Web Server (IIS) page click Next
 image
5 

When asked to add role services for Web Server (IIS) click Next
 image
6 

On the Confirm Installation Selections click Install
 image
7 

Wait until the installation process of features and services finish
 image
8 

Click Close on the Installation Results page
 image


Network configuration

Before configuring the Windows Cluster we should ensure the network interfaces are well configured and that the binding order is correct.
The first network interface will be used for cluster communication and client connection so it should be configured with s static IP address on the LAN range and must be able to resolved on the LANDNS system.
The second network interface will be only used for cluster communication and can be configured with an IP address from another network segment (recommended) and there is no need that its configuration be registered on the DNS system
The last thing that we should ensure is that the LAN network interface is positioned at the first rank on Network binding order for the each cluster node, the action described above should be performed on the 2 nodes.
1


Open Network Connections and then hit the [left-Alt] keybord key to display the menu, on the Advanced menu click Advanced Settings...
 
image
image
2


Using the arrows buttons ensure that the local area connection is positionned above the heart beat interface and disable File and printer Sharing for Microsoft network services for the heart beat interface.
Click Ok to apply the changes.
 
 image
3


Verify you configuration by running ipconfig /all for each node.
Ensure that for the Local Area connection all informations (IP Address , Primary DNS....) are configured
For Heart beat interface only IP Address and Network mask must be configured.
 
 image


mardi 13 avril 2010

Using Managed Services Accounts on Windows Server 2008 R2

Managed Services Accounts is one of the new features of Active Directory components that will be useful for administrators on Windows Server 2008 R2 and Windows 7 computers.
Many applications like SQL Server and IIS uses services accounts that should be configured to start with domain user accounts with SPN functionalities and it’s some times hard to manage this accounts and ensure availability of services when we reset passwords.
Using Managed Services Accounts will improve the administration process of this services and ensure the availability of related applications.

System Requirements

To use managed services accounts :
  • Services must run on Windows Server 2008 R2 or Windows 7 computers
  • Domain level Windows Server 2008 R2 support natively automated management for passwords and SPN for those services accounts
  • If the domain functional level is not yet Windows Server 2008 R2 but the AD Schema is updated to Windows Server 2008 R2, managed services account can be used, but just automated password management will be available
  • To use Managed Services Accounts on Windows Server 2008 or Windows Server 2003 domains or mixed domains we should firstly :
    • run adprep /forestprep at the forest level
    • run adpprep /domainprep on every domain that will use Managed Services Accounts
    • Install a Windows Server 2008 R2 domain controller or Windows Server 2008 with AD Management Gateway Service or Windows Server 2003 with AD Management Gateway Service, AD Management Gateway Service will give us the ability to use PowerShell commands needed for Managed Services Accounts administration.
  • Computers that will host services configured with managed services accounts must have .NET Framework and AD Windows PowerShell module installed

Installing system requirements on Windows Server 2008 R2

1
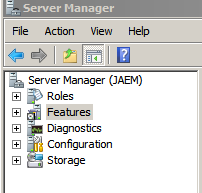
Start Server Manager
image
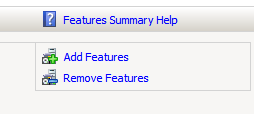
2Select Features and then click on Add Feature
image
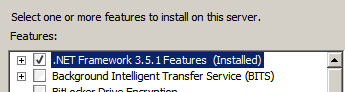
3Select .NET Framework 3.5.1 features 
image
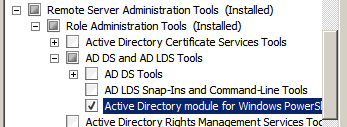
4Select Active Directory module for Windows PowerShell under Remote Server Administration Tools | Role Administration Tools | AD DS and AD LDS Tools
image
5Click Next
image
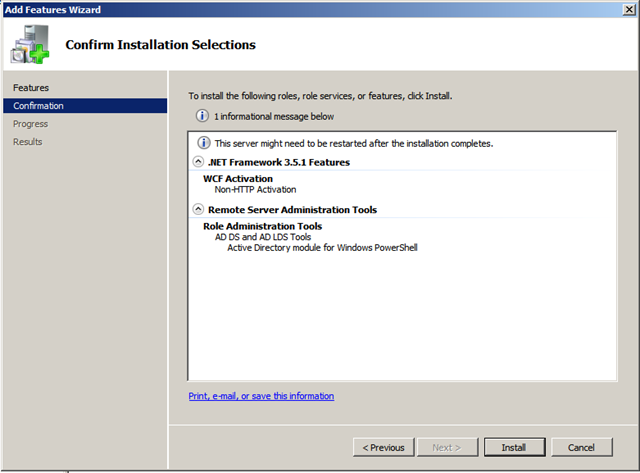
6Click Install
image
7Restart the server if necessary

Install System Requirements on Windows 7

Create and configure a Managed Service Account


Start Windows PowerShell  for AD

2Create the managed services account by running the following command :

New-AddServiceAccount <Nom Du Compte>  -AccountPassword (ConvertTo-SecureString –AsPlainText “<mot de passe>” –Force) –Enabled $true –Path “CN=Managed Service Accounts,DC=<Domain Name>,DC=COM” 
3Associate the managed service account with the client computer by running the following command :

Add-ADComputerServiceAccount –Identity <Nom Ordinateur> –ServiceAccount <Nom du compte>


4Install the managed service account on the client computer (this command should be run on the computer that will hot the service)

Install-ADServiceAccount –Identity <Nom du compte>

5Verify that the msDS-HostServiceAccount attribute for the computer account was updated by the managed service account.

use ADSI Edit to verify this value.


Using the Managed Service Account

After the creation of the Managed Service Account and it’s association with the computer account we can use it to start services on that computer.
For this case we will use it to start SQL Server Reporting Services
1From the Services management console double click on the SQL Server Reporting Services
  
image  
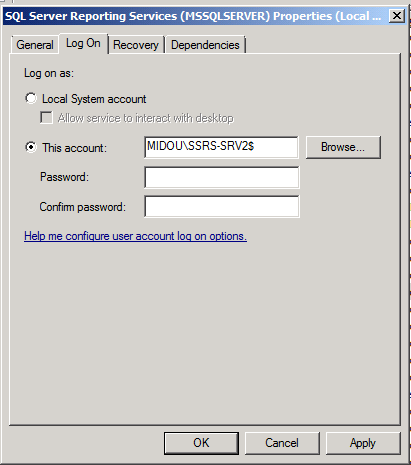
2On the Log On tab check This account  and click Browse to find the managed service account created on the previous step.

Leave the password as blank and click Ok

NB : verify that the name of the account finish with $

image
 
3Start the service

 image
4Verify that the service is started
more details can be found on this articles from Microsoft Site :

lundi 1 février 2010

SQL Server 2008 R2 Release

SQL Server 2008 R2 will be part of the Microsoft’s May price list.
Click here for more details. 

mardi 24 novembre 2009

Changing databases default locations

By default the location of SQL Server 2005 databases files is C:\Program Files\Microsoft SQL Server\MSSQL.1\MSSQL\Data.

Changing user databases default locations

After installing SQL Server 2005 you can change the default location for all user databases that will be created on the server, to do it you have just to modify the database default locations on the server property page.
image
or by executing the code above :
USE [master]
GO
EXEC xp_instance_regwrite N'HKEY_LOCAL_MACHINE', N'Software\Microsoft\MSSQLServer\MSSQLServer', N'DefaultData', REG_SZ, N'E:\UserDB'
GO
EXEC xp_instance_regwrite N'HKEY_LOCAL_MACHINE', N'Software\Microsoft\MSSQLServer\MSSQLServer', N'DefaultLog', REG_SZ, N'E:\UserLOG'
GO

Changing system databases default locations

master database
To move the master database files you have to perform the following steps:
  1. Change the startup parameters of SQL Server service using SQL Server Configuration Manager
  2. image
  3. change the path of master.mdf to the new path inside the –d flag
  4. change the path of mastlog.ldf to the new path inside the –l flag
  5. net stop mssqlserver
  6. move the files from the old location to the new location
  7. net start mssqlserver       
msdb database
To move the master database files you have to perform the following steps:
  1. run a command prompt (cmd)
  2. net stop mssqlserver
  3. net start msqlserver /c /m /T3608
  4. run SQLCMD (be sure that all other SQL Server Services are stopped and that there is no application that will try to connect to SQL Server) 
  5. on the Sqlcmd prompt execute the following script : 
    use master
    go
    sp_detach_db 'msdb'
    go


  6. move the msdbdata.mdf and msdblog.ldf files to the new location


  7. net stop mssqlserver


  8. net start mssqlserver


  9. execute the script

      use master
      go 
      sp_attach_db 'msdb','<new location>\msdbdata.mdf','<new location>\msdblog.ldf' 
      go


tempdb database


To move tempdb database  :


  1. Execute the following SQL script :   USE master

    GO


    ALTER DATABASE tempdb


    MODIFY FILE (NAME = 'tempdev',FILENAME = '<new location>\tempdb.mdf')


    GO


    ALTER DATABASE tempdb


    MODIFY FILE (NAME = 'templog',FILENAME = '<new location>\templog.ldf')


    GO


  2. net stop mssqlserver


  3. move tempdb.mdf and templog.ldf files to the new location


  4. net start mssqlserver


model database


to move model database :


  1. run a command prompt


  2. net stop mssqlserver


  3. net start mssqlserver /c /m /T3608


  4. run SQLCMD


  5. detach the model database : 
    use master
    go
    sp_detach_db 'model'
    go


  6. move the model.mdf and modellog.ldf files to the new location


  7. attach the model database :
    use master
    go
    sp_attach_db 'model','<new location>\model.mdf','<new location>\modellog.ldf'
    go


  8. net stop mssqlserver


  9. net start mssqlserver